How to Draw a Face in 8 Steps for Beginners
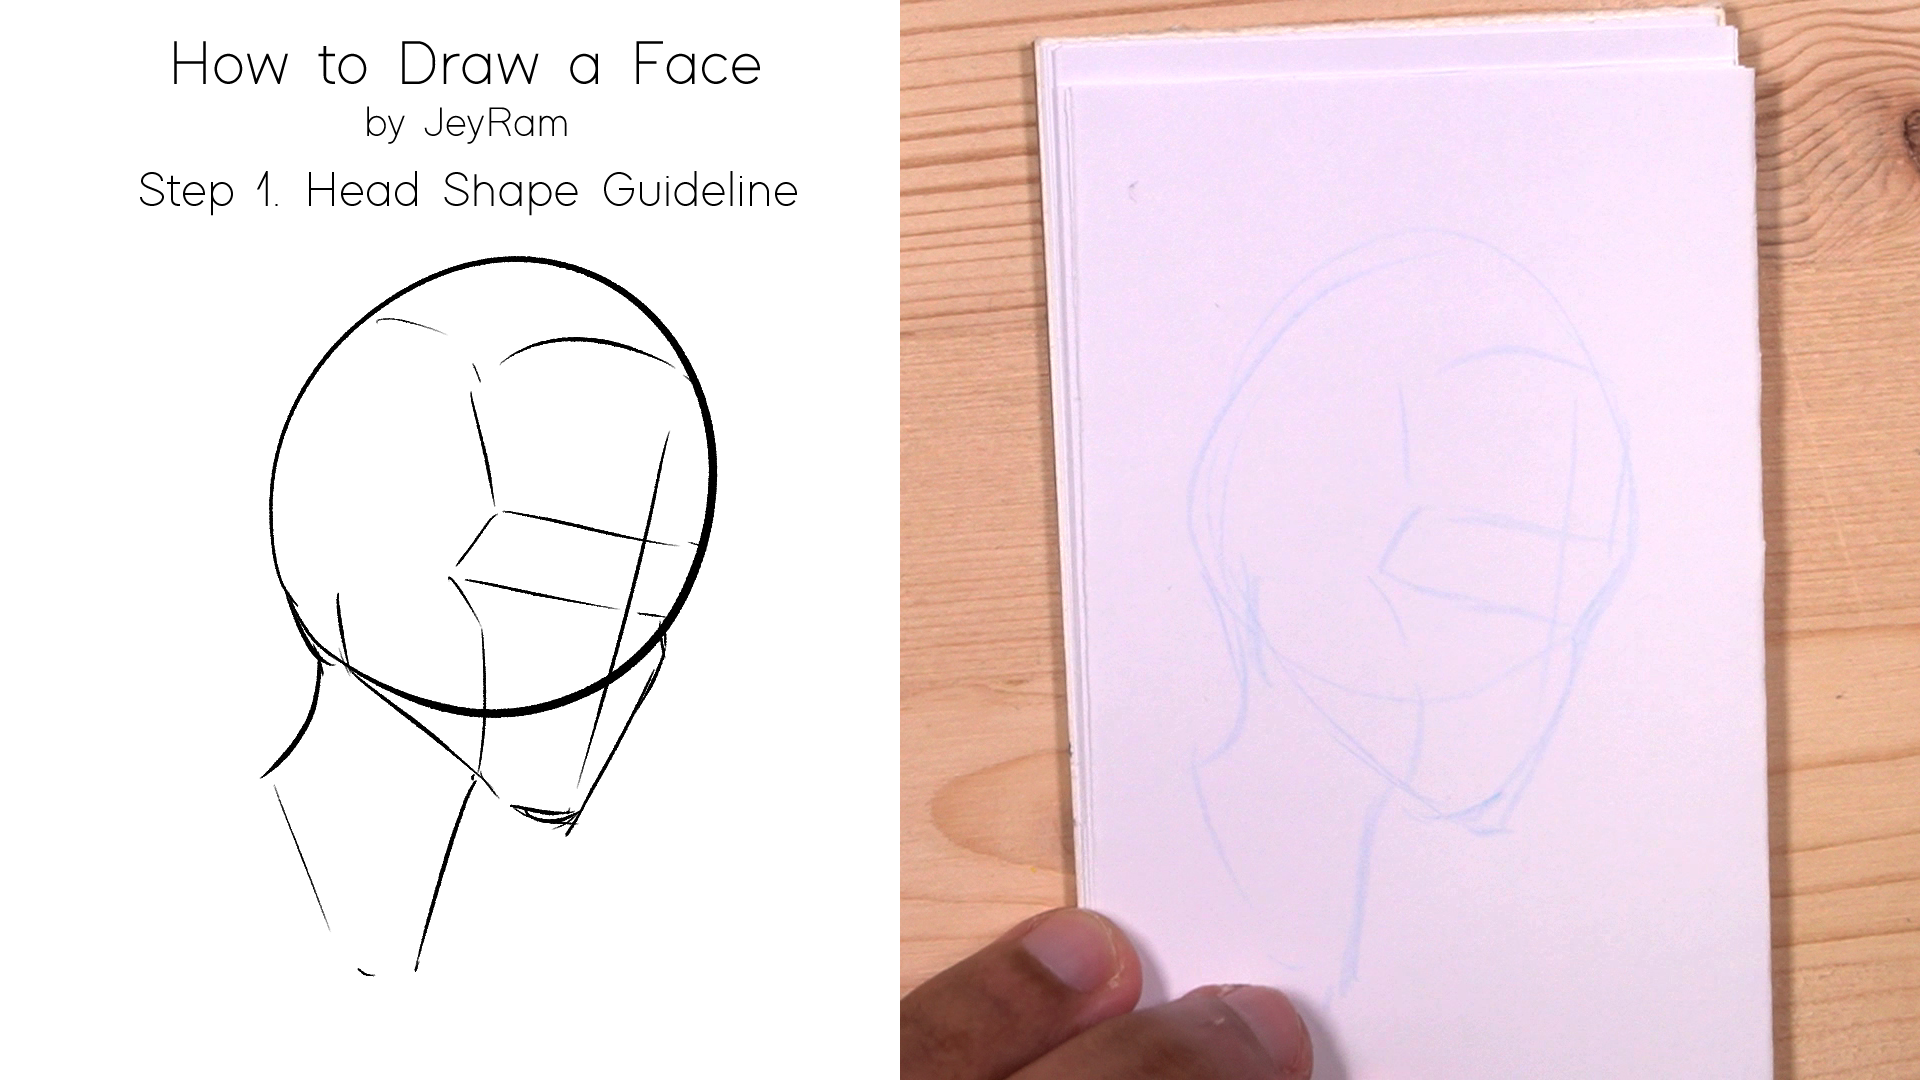
Step 1. Headshape Guideline
To start off we want to draw guidelines for the overall shape of the head. This will help us get a sense of the direction the head is facing and where the to place the features. When starting off we want to pick angles that are fairly easy to use, in the example you will see that I am drawing at a three quarter angle which isn’t an extreme angle. Avoid heads that are looking too far up or too far down when getting started, those angles are much harder because the features get distorted.
Use light lines when drawing in the head, this way we have an opportunity to make changes to the shape of the head if we decide that we want a slightly different shape. I have a line by line tutorial on drawing the head here that you can use to help you learn how to draw this step. Also make sure to use the free worksheets below to help you practice.
Make sure to take time to practice the base shape of the head, without laying the proper foundation we wont be able to draw good faces. We will rely on these initial guidelines for the placement of the features so if it they are incorrect then you will have an even harder time down the road. I highly recommend taking time to just practice the shape of the head for many hours using the worksheet and references to first get you comfortable with this step before moving forward!
Step 2. Add the Structure of the Nose
For the second step let’s add in the nose. Give it a basic block in, this will help us divide the lower half of the face. Make sure to leave room for the lips by drawing in the nose half way down from the eyebrow line to the chin. The nose will fall about down to this half way point, this obviously depends on the character of the face but starting with these generalized rules will help you learn the basic before jumping into stylizations.
There are a variety of nose shapes you can use, for the example you can see that I have used a very angular and basic nose. Starting with a very structural nose can make the learning phase a bit easier compared to using a lot of round forms. The worksheets below will help you develop your understanding of using rounded forms and you can also check out the step by step tutorial for the nose here.
Step 3. Draw in the Base Shape of the Eyes
For the third step in the process I like to drop in the outer shape of the eyes. Pay attention to placement and the design of the face, here are some things to consider:
How big are the eyes in relation to the head and nose?
Is the placement correct?
Do the eyes follow the angle of the head?
Step 4. Draw Lips
Now we can add in the shapes of the lips slightly below the nose. The lips go half way between the nose and the chin, this is why it is useful to leave the headshape guideline very light because it gives us the opportunity to change how far down the chin is after adding in the lips.
I will also go in and define where the chin is once I have the lips in place because I have a better sense of how the features fit with the overall shape of the head. Use the free lip drawing worksheet below to help you practice lips at multiple angles.
Step 5. Add Eyebrows and Details
With the lips and chin in place we can now go back into the eyes and add further details. Start by giving the character some eyebrows using the box and tail method that we learned in the Eye Worksheets above, you can also use this step by step tutorial for the eyebrows.
In this step we will also draw in circles of the eyes and give the character some eyelashes. For the example she is looking away from us so the eyes are located toward the right side, make sure to get the placement of the eyes correct based on where you want your eyes to be looking.
Step 6. Draw Ears and Add Details
With all the other features in place we can now draw in the ears, feel free to use the worksheets below to help you practice drawing the ears. I also have a simple ear tutorial here that you can use and also a more complex one here, for the example drawing I'm using the simplified approach to drawing the ear.
In this step of drawing the face I will also start to define the jaw and neck, now that we have all the features in place it becomes much easier to see if I need to make any changes to the shape of the head.
I have also added more shading to the underside of the nose, the upper lip and the darks of the eyes. To keep things simple and easy I have left out some of the details in the eyes and nose, you could draw more detailed pupils and nostrils if you want but starting with a simple approach can make the learning process more manageable.
Step 7. Add Hair
Now we can finally add hair to the character. For this drawing I drew a ponytail which is a great hairstyle for beginners because it's simple to draw. A ponytail is made up of two major shapes, the cap of the hair which covers the scalp and the tail itself. Use the worksheets below to get familiar with this process.
Pay attention to how I am drawing the hairs in the direction that they would flow, all the small lines describe the movement of the hair. In this step I have also finished adding in the neck and added some shading under the chin to help build dimension into the drawing.
Step 8. Add Final Details + Erase Guidelines
Now that we are at the end, this would be a good time to erase away any guidelines that you dont want. For the example drawing I just left the guidelines because they are so light.
You could also go back in and add further shading and details into the drawing, make sure that there is a nice contrast in the face and that you havent drawn things too lightly. You especially want to make sure the circles of the eyes are dark because that is what captures the viewers attention first.
Thank you so much for checking this tutorial out, for more portrait drawing tutorials you can click here


