

How to Draw Cherry Blossoms
In this tutorial we will learn how to draw beautiful Cherry Blossom flowers on branches using the free worksheets and video tutorial! Grab your pencil and let's get to drawing together.

Learn how to draw easy Cherry Blossom trees using this free printable PDF Worksheet! Learning how to draw beautiful flowers is perfect for beginners! I recommend drawing with pencil and using an eraser for the worksheet if you are working traditionally.
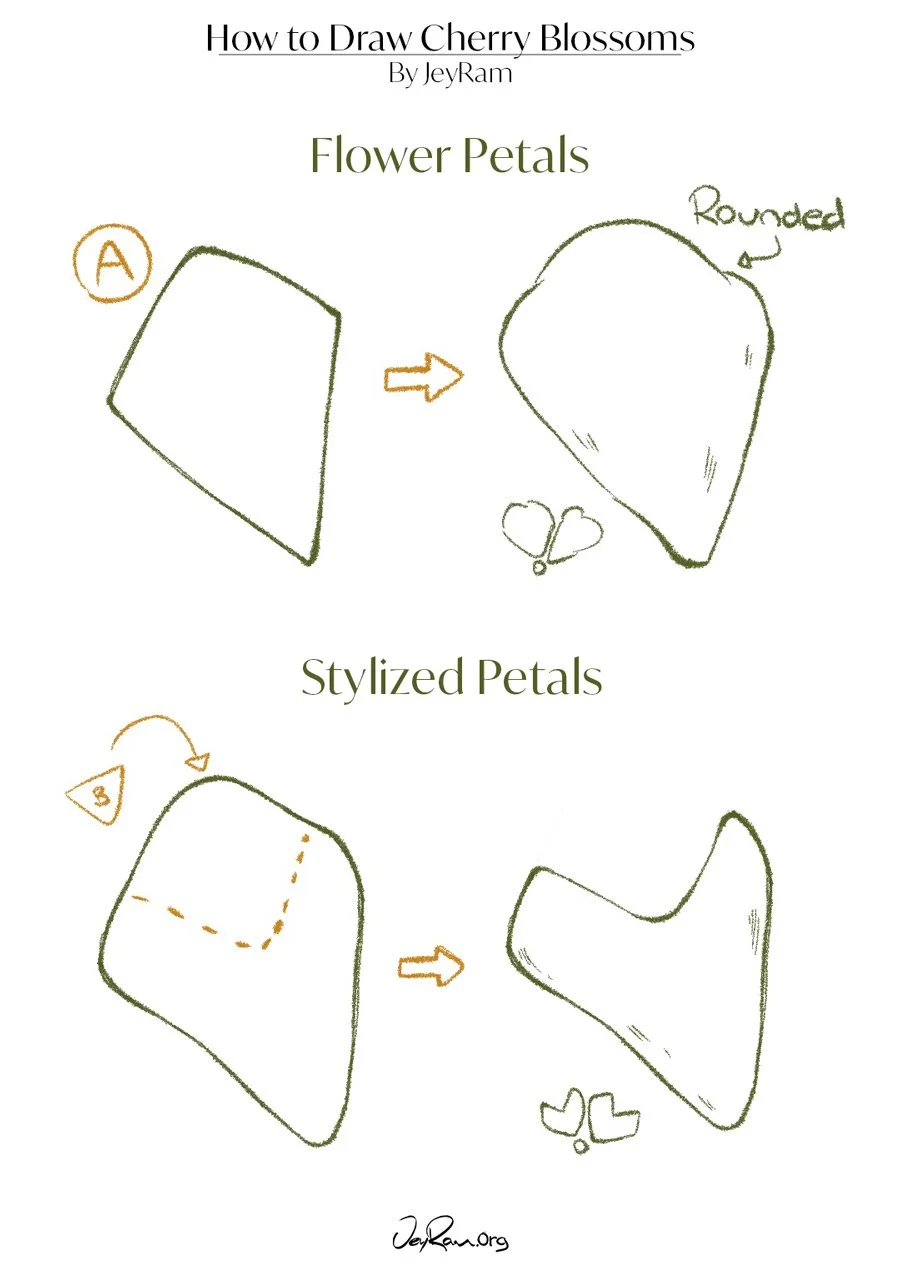
Step 1. Flower Petals
To start off let's practice drawing some basic flower petals. As seen in example (A) the cherry blossom petals are somewhat like a kite shape that has been rounded. Feel free to draw some of these kite shapes first and then round them to get used to drawing these.
Make sure to take your time here, especially if you are a beginner artist. It can be quite tricky to get used to drawing these types of curved and straight lines.
Use the worksheet and then draw some of your own in your sketchbook to solidify what you have learned
Step 2. Stylized Petals
We can also draw these stylized flower petals that are common within anime. Draw the same flower petal as before but this time cut out a triangular shape (B) from the outer rim of the flower.
This is a style preference so it's up to you if you want to continue using this style. Make sure to experiment to see which way of drawing these petals suit you best.
Keep drawing these flower petals until you feel really comfortable with them. Remember that there are no extra points for rushing! Taking your time to learn each step will make the entire drawing journey more enjoyable.
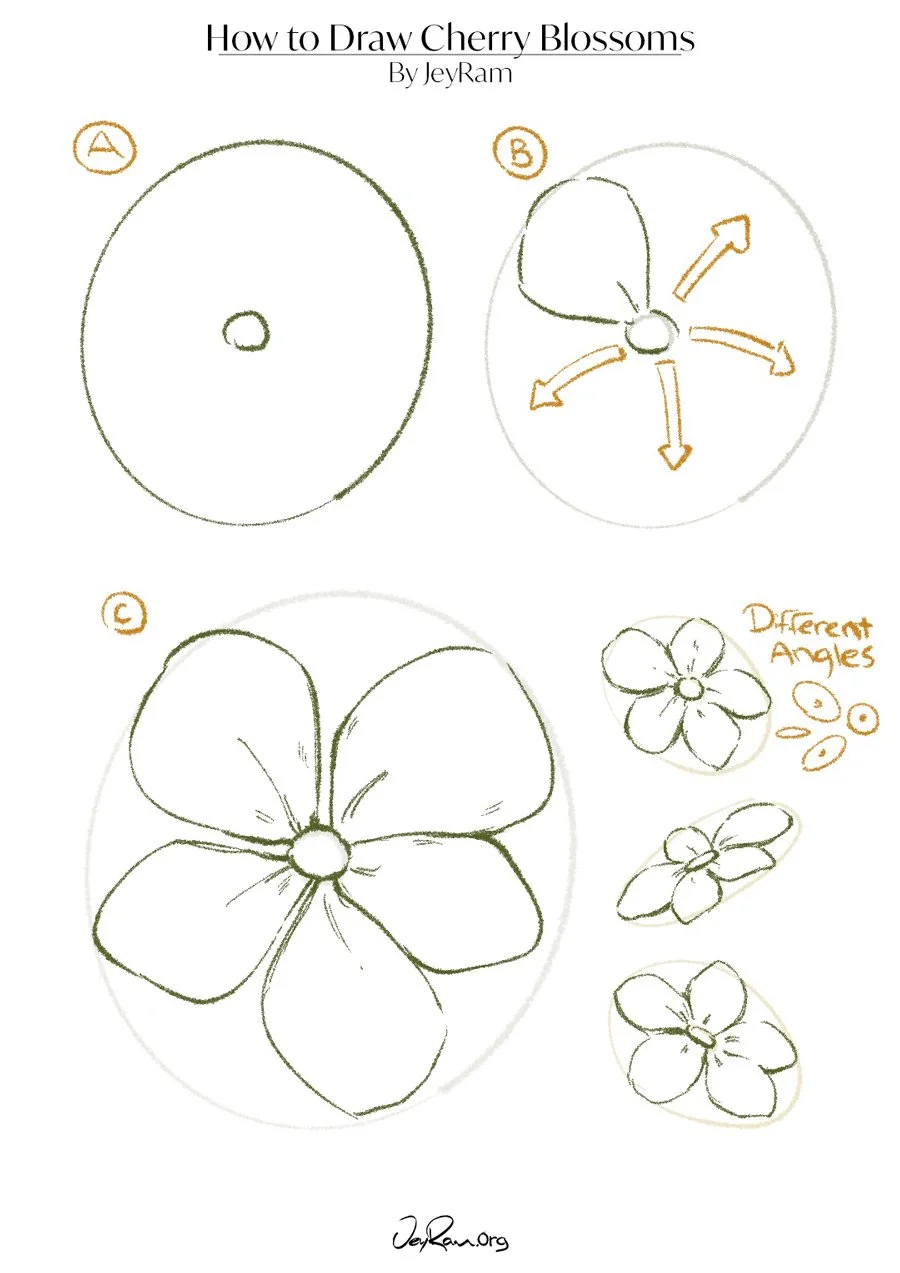
Step 3. Full Flowers
Now that we are comfortable with the flower petals we have the basic building blocks for drawing full flowers. Start by drawing a circular guideline with a smaller circle in the middle to help visualize the size, angle and shape of our flower.
We cover the topic of Guidelines in my Flower Drawing Course if you are interested in a deeper dive into drawing flowers! The course is designed around using worksheets and we will learn some basic concepts, then apply those ideas to Roses! Click here to learn more!
This circular guideline makes it much easier to draw in the 5 flower petals that make up the cherry blossom. It can be helpful here to lightly erase the guideline so it's barely visible before drawing in the petals.
In example (B) you can see how the petals flow away from the middle. I find this visual very helpful in understanding the structure of these flowers. We can also adjust the shape of our circular guideline to draw the flowers at different angles.
Copy from the example on the worksheet and then draw some cherry blossoms in your sketchbook. Take your time and be forgiving! Remember that learning anything new takes time and making mistakes is part of the process.
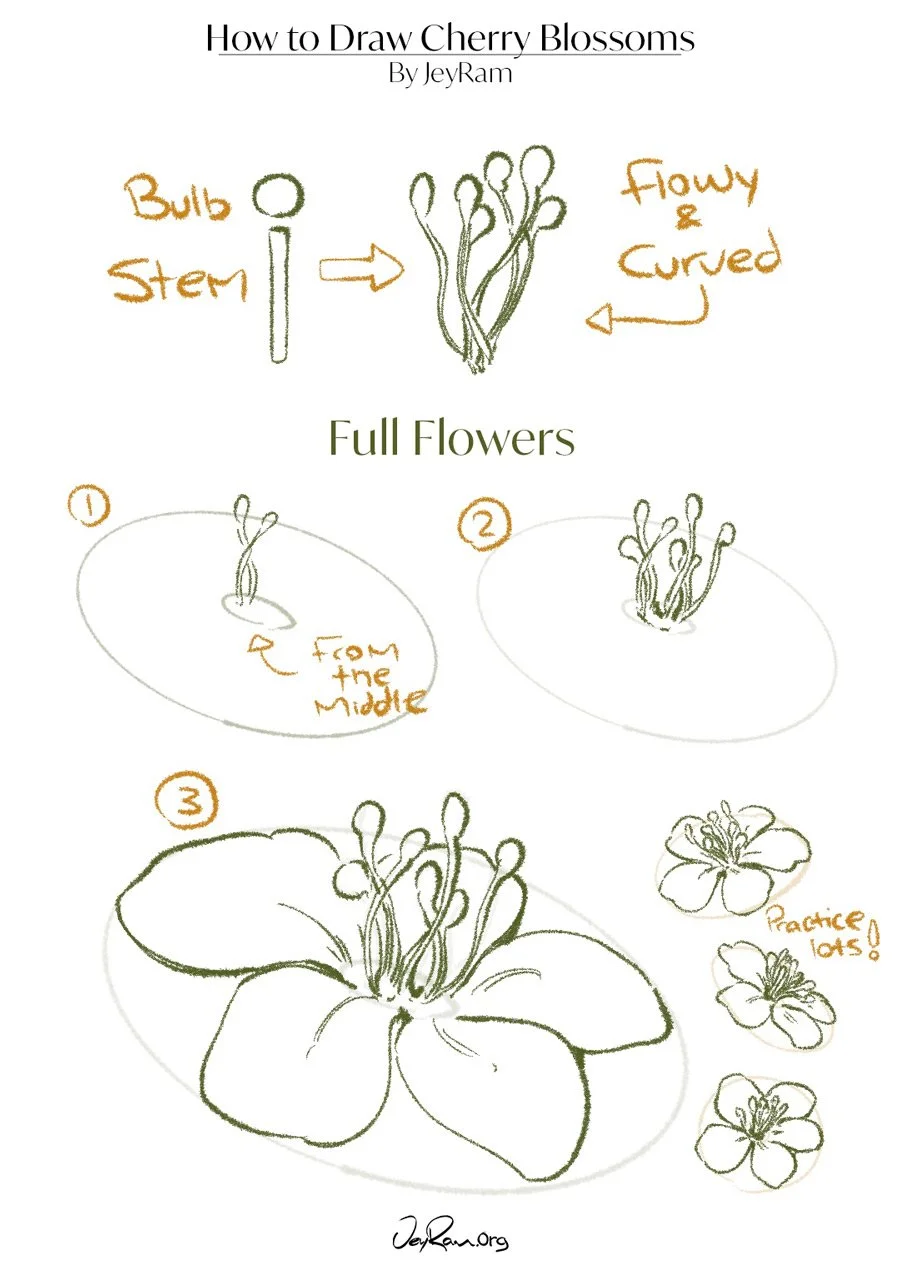
Step 4. Stamen - Frilly Bits
One of the key features of Cherry Blossoms is their middle section of frilly bits (not the technical term.. I just think this is a cuter name LOL).
They are made up of thin stems and bulbs at the top. Practice drawing these and make sure to make them flowy and curved so they feel natural. This is a big part of why Cherry Blossoms are such beautiful flowers.
Start with the guideline drawing (1) and draw a couple of the frilly bits, then keep adding more before drawing in the flower petals. How many of these you want to draw is a personal preference. Some artists will draw very thin frilly bits while others will make them larger.
Experiment to see what works for you! Make sure to practice lots in your sketchbook before moving onto the next stage
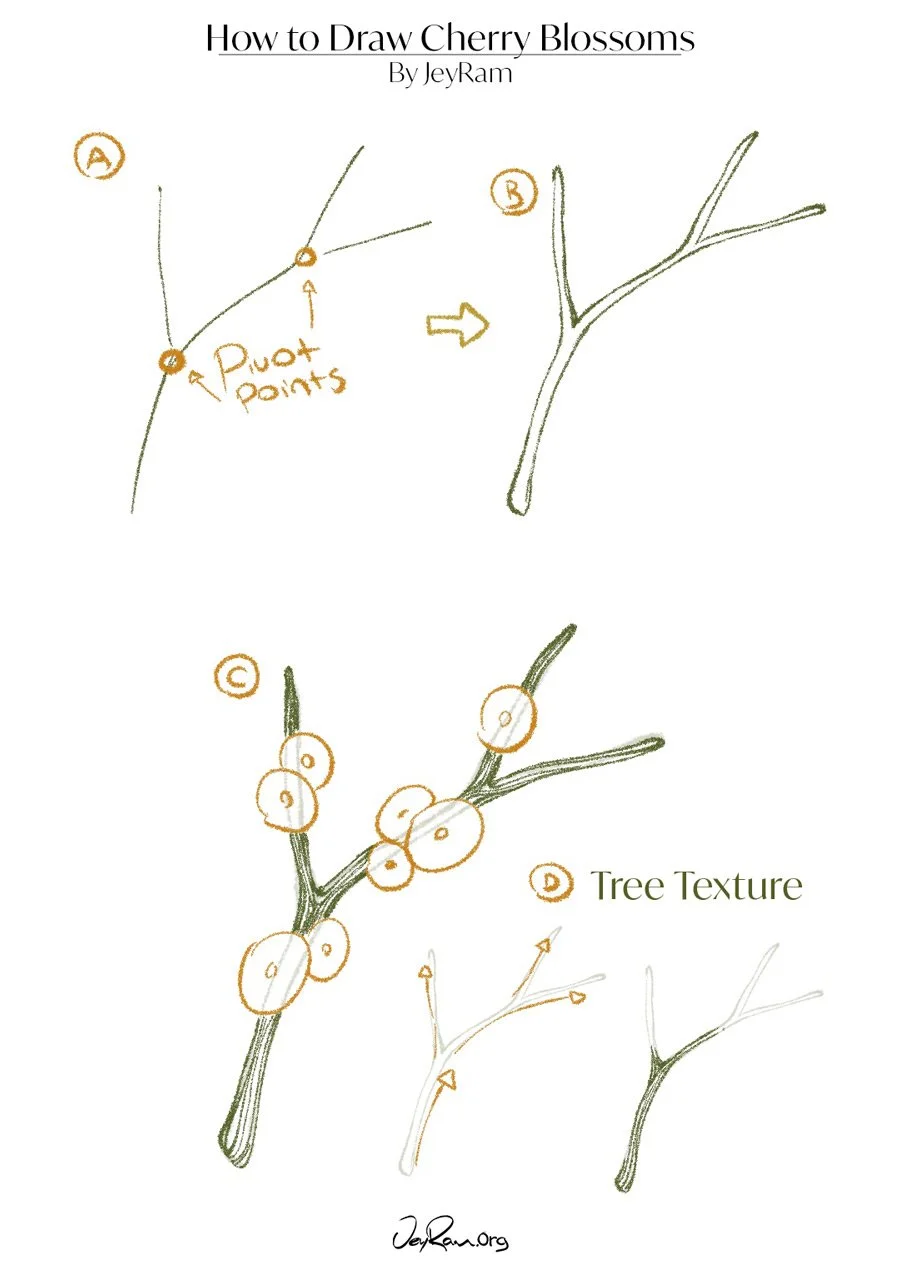
Step 5. Branches
Now that we have a grasp on how to draw the flowers lets start practicing the cherry blossom branches that make up the tree component. Start by drawing lines that are somewhat curved but pivot at different angles as seen in (A).
Drawing natural looking branches will take some practice but copy from the examples on the worksheet first before drawing some of your own. Once we have the basic guidelines for the size and shape of the branches, add volume to them as seen in (B). You may have to erase parts of the initial lines to make this look natural.
Then you can also add flowing lines across the branches to give it the tree texture as you can see in example (D)
Step 6. Branches & Guideline
Now we can combine our Cherry Blossom guidelines and branches to bring us one step closer to a complete drawing. Take your time and practice in your sketchbook!
Remember that each step in the process is designed to make this as easy as possible for you to learn. So it will feel simpler to learn if you take the time to digest each lesson fully before moving on. This is especially important for beginner artists and it's also why I recommend drawing in pencil and using an eraser when you first begin!
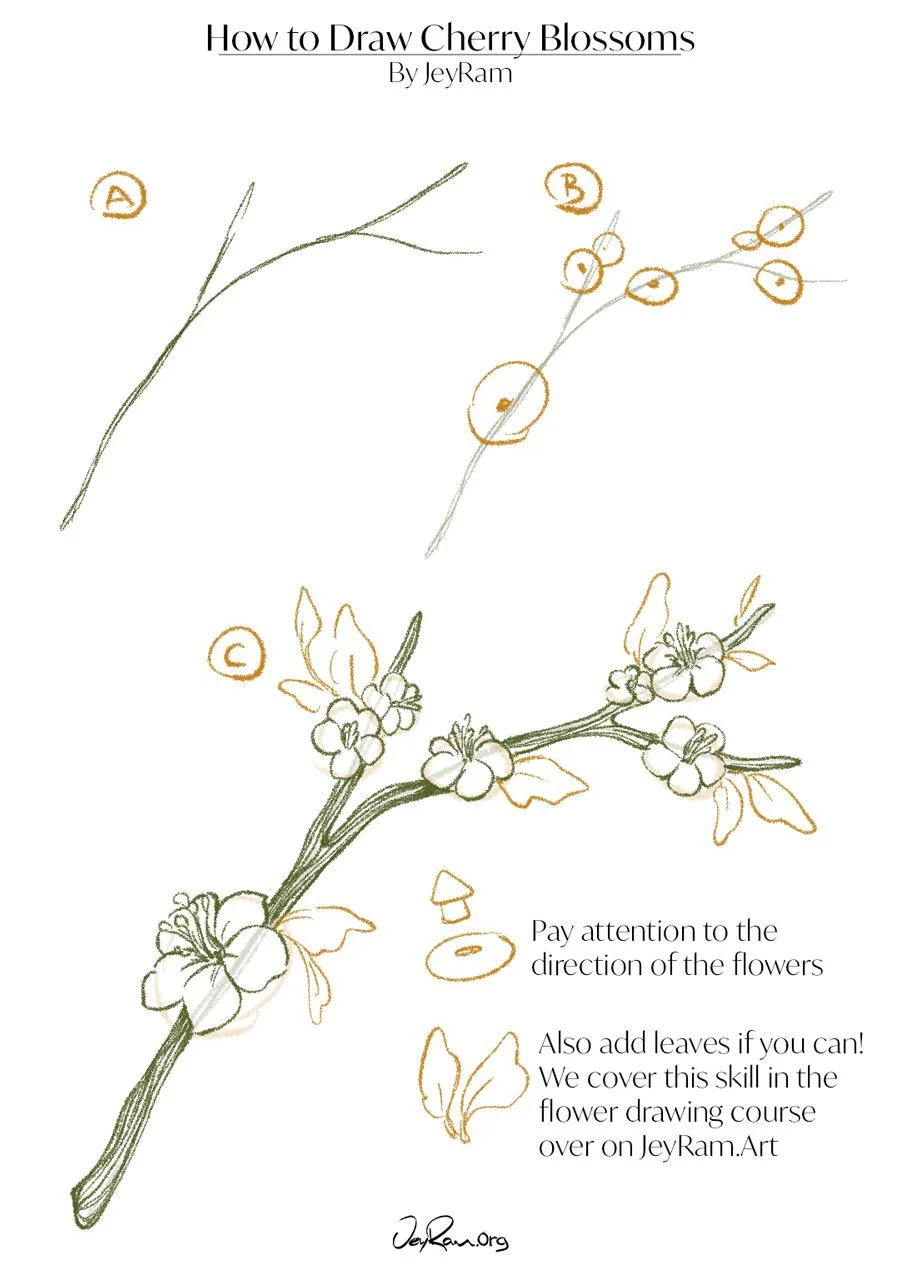
Step 7. Complete Cherry Blossoms!
Let's combine everything we have learned to draw complete cherry blossom branches using our easy method.
Start by planning out the branch you want to draw and lightly sketch in the guidelines. Erase and adjust the drawing until you feel happy with the direction of the drawing. Pay attention to where you are drawing clusters of details to make the drawing visually appealing.
Once you are happy with the guidelines, lightly erase some of the lines so they don't stand out as much but keep them visible enough to help you with your drawing.
Start filling in your flowers and focus on the direction the flowers are facing. Keep filling in the flowers, then add some leaves if you know how to draw them before completing the branches.
If this tutorial was helpful to you make sure to share it with a friend! Drawing is especially fun when you do it with people you care about.
Do you want more Cherry Blossom worksheets? In my flower drawing course we have 3 additional lessons on drawing more intricate Cherry Blossom petals and drawing the cute little buds. Feel free to check it out if my lessons have been helpful to you!
Thank you so much for drawing with me!
