How to Draw Anime Eyes
For this tutorial I have made a simple step by step tutorial that you can follow line by line and also a downloadable PDF with exercises to help you get tons of practice in. Make sure to grab the free worksheets below! :D
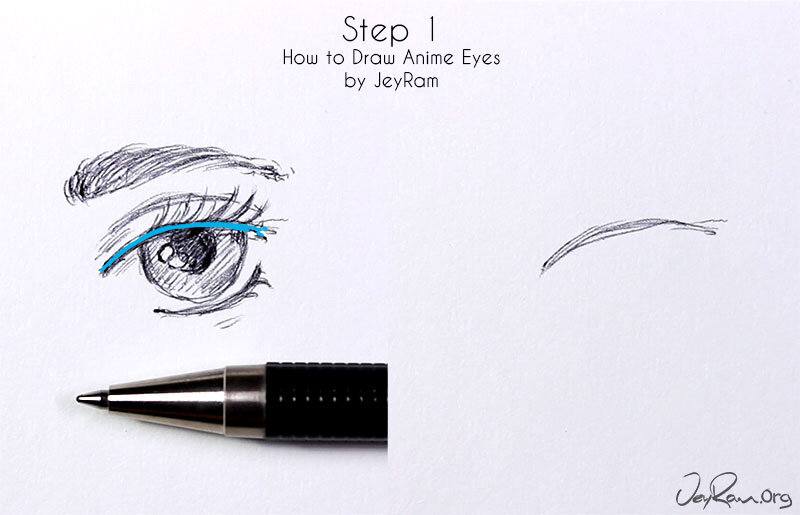
Step 1. Upper Lid
Start drawing the eye with a curved line for the upper lid, the left corner is slightly lower than the right side. Use the diagram on the left to see what line we are working on and where we are headed in the tutorial :D
Step 2. Semi Circle
Draw an elongated semi circle for the core of the eye
Step 3. Lower Lid
Draw a line that curves upward and is close to the semi circle, you can also overlap this line over the semi circle if you want more of the eye covered. I usually leave a little bit of room but you can play around with how open you like to draw your eyes.
Step 4. Eyelid Crease
Add a curved line that mimics the top eye lid line that we started but space it further up the image. This marks where the eyeball begins to protrude from the face. Darkening this line and adding shading above it is a method for adding depth to the eye if you want a more dramatic effect, for this drawing I will be keeping it fairly light but it is something you can keep in mind as you play around with different styles.
Step 5. Highlights
Add two small circles within the semi circle that define the shape and size of the highlights, I like to place them close to where the pupil will go because that way we get this one place of very high contrast between the white of the highlight and the dark of the pupil. In a lot of anime & manga these highlights are drawn very big or you will see many highlights in a single eye, play around and see what works best for you.
Step 6. Shade
Darken the semi circle without touching the highlights, dont go too dark with this shading because we want the eyelashes and pupil to be darker.
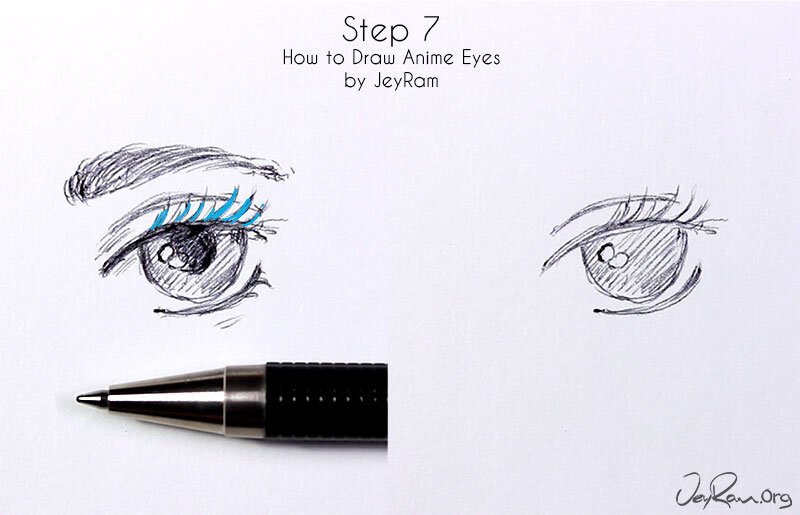
Step 7. Eyelashes
Draw in swooping lines that curve out and up for the eyelashes. I recommend you take some time to practice these lines and getting a natural feel to your eyelashes. Make sure to create a variety of lengths and sizes, take note of how the lashes that I draw are thicker towards the base and thinner towards the top. I do this because I like to imagine that shorter hairs wont reach that far out but will add dimension to the eye, these details will help you get a natural effect to the hairs.
Step 8. Pupil
Draw a circle in the middle of the semi circle thats slightly towards the top. I make sure that the dark of the pupil is being cut off by the upper lid so the expression of the eye doesnt feel like its surprised. I am trying to achieve a relaxed and natural look with this eye and getting the pupil right is an important part of that feel.
Step 9. Shading
Add some small lines right beneath the upper lid and in some of the curves to give the eye more dimension. The amount of shading and details you can put in is limited by the size that you draw at, it will be difficult to add a lot of small details if you usually draw very small.
The important part of drawing is getting the form down so dont worry about shading if you are just getting started, but if you do want to spend lots of time shading you should consider drawing some eyes at a larger scale because it leaves more room for play.
Step 10. Eyebrows
Draw in the eyebrows, I have a step by step tutorial on eyebrows here that you can use & there is also an explanation of eyebrow hairs on page 3 of the free worksheets
Step 11. Darken
Darken the upper eyelid and anywhere else you feel like you want more dark lines. Play around with darkening the eyebrows, lashes and pupils to find what you like and learn through experimentation. Drawing is tons of fun and the ability to play is an important part of falling in love with the craft.
Annd we are done! thank you so much for letting me be part of your drawing journey! If you enjoyed this tutorial and want to practice drawing a variety of eye styles, consider grabbing the worksheets below. I create these worksheets to make the technical parts of drawing much easier to learn, we will do a lot of copying from example because its by far the best way to learn how to draw. I also have tons of free tutorials on the site that you can check out :D
Quickly learn the basics of drawing faces and start having fun with this simple drawing course designed for beginners!
This Course Includes:
✓ Over 14+ hours of video content!
✓ 35 Video Lessons!
✓ 35 Printable Reference Sheets!
✓ Real time video with voice over!


