
How to Draw an Orchid
Welcome to this drawing tutorial! Thank you for letting me share my love for drawing with you :D Feel free to use whatever tools and materials you like the most, I highly recommend drawing with a pencil when you first start so you can make mistakes without stressing about it! Never be shy about erasing ^.^
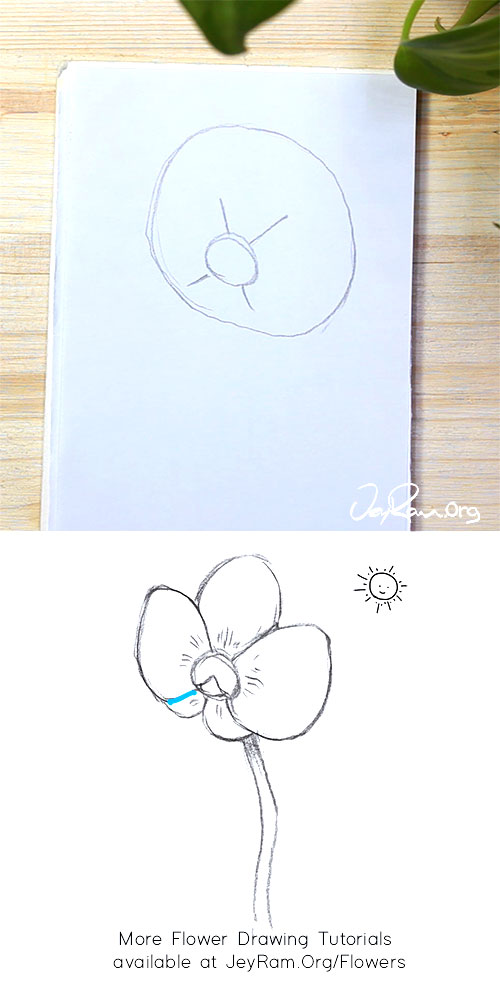
Step 1. Guideline Circle
Start by drawing a large circle towards the top of the page or where you want the orchid to be. The size of the circle will define the size of the flower because this guideline will be the outer edge of the flower (in blue in the diagram below). Draw your guideline slightly lighter than I have drawn it because it will be erased away later, I just drew it darker to make sure you could see it clearly :D
Dont draw your circle perfectly round, try to give it a slightly uneven shape to make the flower have more of an organic shape.

Here is a video version of the tutorial if you want to see it drawn in real-time
Click Here to Open in New Tab
Step 2. Center Circle
Draw a small circle in the bottom half of the guideline circle, make sure that there is space all around it and it isnt touching the guideline. Pay attention to how the circle feels slightly squished.

Step 3. First Petal
Now that we have the core structure and guidelines in place we can start to draw the petals for the flower. The key to drawing petals is to remember that the edge lines of the petals move away from the core. Think about how sun rays move away from the sun, we want the same effect with the outer edges of the flower petals. Our little Sun Buddy in the diagram is here to remind us of this point!
Draw a line that starts at the the top right portion of the core and curves outwards towards the guideline circle.

Step 4. Left Petal
Draw an opposing line to the last one that starts at the top left portion of the core and moves towards the guideline circle on the left. Try to capture a similar distance and angle between these lines as I have below. We are drawing these lines in to help us plan the petals in a way that will be balanced.

Step 5. Bottom Curve
Add a small curved like to the bottom right of the core.

Step 6. Bottom Left
Add a small curved line to the bottom left of the core.
Step 7. Petal Top
Returning to the first line we drew, we add a curved line that goes out to the guideline circle. This defines the top edge of the large petal on the right side.

Step 8. Bottom Edge
Repeat the process for the bottom line, the line ends at the guideline circle.

Step 9. Complete Petal
Finish the petal by drawing a line that follows along the guideline and connects the last two lines.

Step 10. Top Left
Add the top edge line for the left petal that ends at the guideline circle.

Step 11. Complete Petal
Finish the petal by adding a curved line along the guideline (in pink) and connect the bottom left line to the guideline (in blue).

Step 12. Top Petal
Add a curved line from the top of the left petal up to the middle of the guideline circle. This petal sits behind the other two so some of its line are hidden, make sure to pay attention to this type of overlap. We draw the petals at the top first to help us get this layering effect.

Step 13. Right Top Petal
Complete the top petal by curving back down to the top edge of the right petal.

Step 14. Bottom Right Petal
Add a very small petal to the bottom right by starting at the mid bottom point of the core (the small circle we drew in the beginning), come down to the guideline (in blue) and curve into the petal to the right (in pink).

Step 15. Left Bottom Petal
Repeat the process for the left side except start this line at the edge of the last petal instead of at the core. This is another place where we find this nice overlap effect.

Step 16. Core Line
Add definition to the core by adding a curve line that starts towards the bottom left and goes up towards the middle.

Step 17. Complete Core
Add a curving for the opposite side that meets at the end point of the last line. It should look like a tiny mountain in the small circle.

Step 18. Curved Line
Add an extra line right by the circle of the core at the bottom.

Step 19. Stem
Add two tilted lines that start towards the center of the flower and move towards the right (in blue) and then add another two lines that are more vertical (in pink). This angular stem helps show that the orchid is facing slightly left.

Step 20. Erase
Erase away the outer guideline and any other mistakes you want to fix. I am using a kneadable eraser which is a puddy/playdough like eraser that you can mold into whatever shape you want. I prefer these erasers because they don’t leave any shavings :D.

Step 21. Fix Lines
Darken any lines that accidentally got lightened by the previous step. This is also a good place to fix any curves that you dont feel satisfied with. Never be too shy with erasing and trying things over again, that’s the only way we learn and getting into the habit of making mistakes will make drawing much more fun.

Step 22. Petal Lines
Add lines to the petals towards the core, these lines flow in the direction of the petal (remember out little Sun Buddy :D).

Step 23. Shading Lines
Add more shading lines to the rest of the petals and to the stem where it connects to the flower. The shading on the stem helps indicate that the stem is going underneath the flower.

Step 24. Clean Up
Clean up the drawing by erasing any other mistakes and darken areas as you please. Feel free to add more shading to the drawing if youd like, I prefer minimal shading so thats the approach I have used here but play around and figure out what you like. If you want to experiment you can take a second piece of paper, place it overtop and then trace your drawing against a window (so the light helps you see the lines underneath). This way you can quickly create copies of the drawing and have free reign to play around without worrying about messing up your initial drawing.

Final Step
Celebrate your drawing!
Yaay finished the drawing! Thank you so much for letting me share my love for drawing flowers with you! I really hope this was fun for you and maybe (just maybe) this tutorial has helped you realize that you can totally learn how to draw. I learned drawing at a later age so I know that this is a learn-able skill that anyone can pick up at any time (with effort, of course).
Check out more of the tutorial on the site! I've put lots of effort into creating these free resources because I want more people to fall in love with drawing. So feel free to share the link to this tutorial with friends :D That would be tremendously helpful to me on this mission to spread the love for drawing.
I have created a 20 page Printable Workbook (PDF) that will teach you how to draw different floral arrangements. I wanted to create something that could really speed up someone's learning and actually get them drawing. I poured tons of time into it to make it as useful as possible to someone who wants to capture the elegance and beauty of flowers, I would looove it if you grabbed your copy and drew with me some more!

Learn how to draw roses with this 21 page printable workbook that will walk you through a series of drawing exercises. This workbook is designed to help you rapidly improve your drawing ability through hands on practice!
