How to Draw the Torso
Welcome to this drawing tutorial! Make sure to grab the free worksheets below and take time to practice. Drawing is a skill that requires hands-on practice so make sure you spend more time making art than consuming tutorials.
Simple Forms
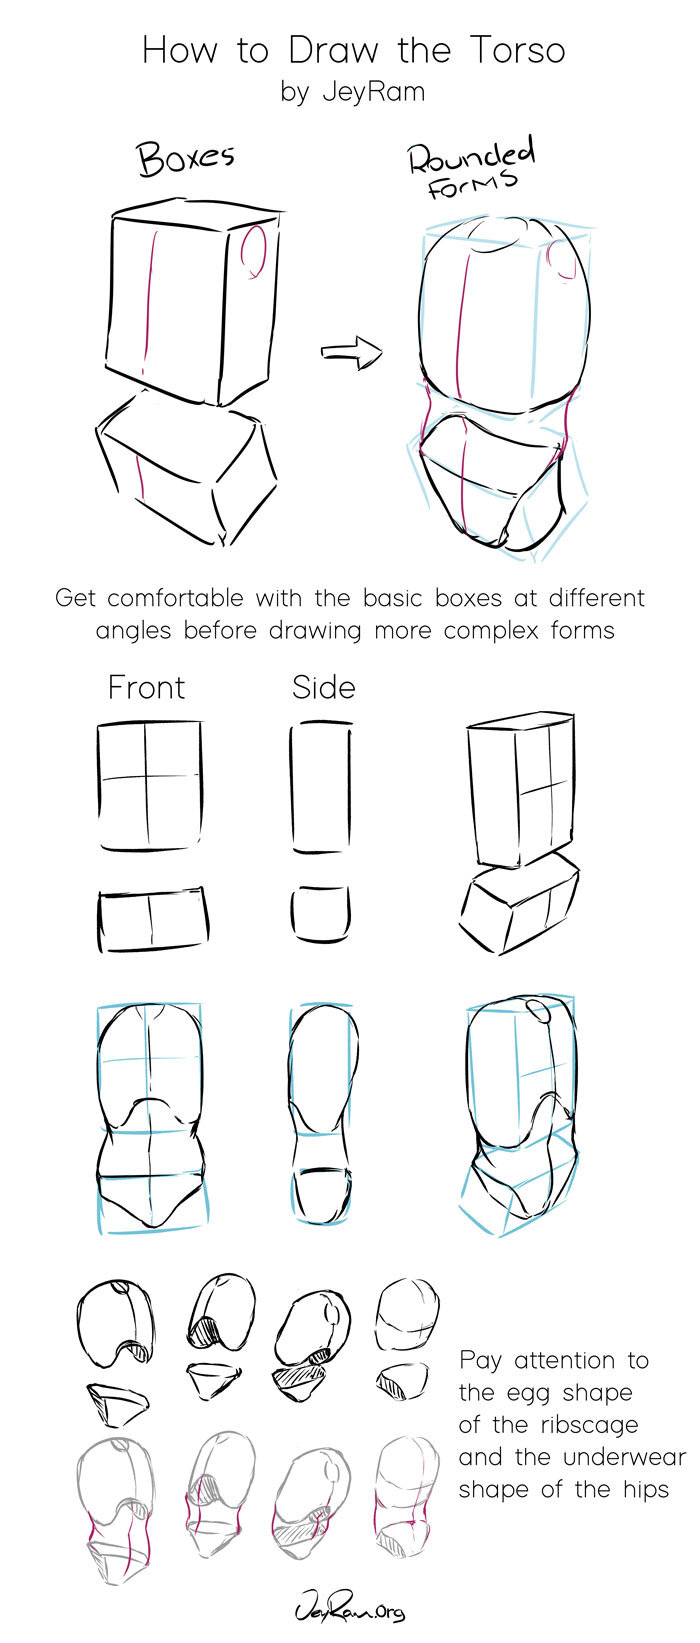
There are two major steps to understanding the torso. The first step is made up of two boxes for the ribcage and hips. At this stage, we leave the stomach area empty because the stomach doesn’t have a solid structure.
When practicing this stage I recommend that you pay attention to the tilts of the ribcage and hips and try to capture the natural flow of most poses. Use lots of references and try to simplify down two of these major forms.
Notice that the box at the top is much taller while the bottom one is short. You can play around with these proportions to get a large variety of character designs but ribcage is almost always drawn taller than the hips.
Practice the box stage until you are fully comfortable with it before moving forward, getting the simplified forms down will make the entire process much easier
If you want help with drawing boxes that have dimension, you can check out my Basic Forms tutorial here (Opens in a new tab)
Complex Forms
In the second step, we draw an egg shape that has a rounded space toward the bottom which makes up the ribcage. For the hips, we draw a form that is reminiscent of a pair of underwear, drawing in the hips this way makes it much easier to draw in the legs once we get to draw the full figure.
Take note of how the ribcage has a curve (towards the center bottom) on the front side that does not exist on the back. Putting this curve helps us describe the perspective of the ribcage and also gives definition to where the stomach begins. In the last few examples, you can see how I have darkened the inside region of this form to give it more dimension.
Draw a few ribcages and hips without the stomach to begin with until you are comfortable with these complex forms. Once you have got a hang of it, draw in the stomach.
For the stomach, we extend the center line and curve it slightly to give it an organic feel. This will feel natural once we draw in the ribcage and hips first. Use references to study and then try to draw the same poses from imagination, this will help you reinforce what you have learned.
I hope this was useful to you! If you want more hands-on practice you can check out the worksheets I have below and also check out the rest of the tutorials available on the site! Thank you for letting me be part of your creative journey ^.^
How to Draw Literally Anything 🥰
Want to learn how to draw anything you can imagine? It all starts with a few simple forms. Once you know how to use basic forms and turn them in space, you can draw pretty much anything: people, animals, buildings, you name it. 🥳
This bundle makes it super easy.
We’ll start with the Beginner’s Toolkit; a set of fun video lessons and printable worksheets that break things down step by step.
No stress, no fluff. Just the essential skills you need to build a strong drawing foundation. Perfect for total beginners or anyone who wants to level up their art. ✍️


